


Drilling Holes Safely
When preparing to drill holes in your wall for a mounted organizer, it’s essential to start with the right tools and techniques. Ensure you have a quality drill, appropriate drill bits, and safety equipment like goggles and gloves. Before making any holes, identify where the studs are located behind the wall using a stud finder. This tool helps avoid unnecessary damage and ensures that your installation will be secure. Mark these locations with a pencil for accuracy.
Another important aspect is to choose the right drill bit based on the type of wall material. For drywall, a standard bit will work, but for masonry or concrete, a specialized masonry bit is necessary. Additionally, when drilling, maintain a steady hand and keep the drill perpendicular to the wall. This practice helps create cleaner holes and prevents the bits from slipping. Remember to drill slowly at first to get a feel for the material before applying more pressure.
Techniques for Safe Drilling
Having the right tools makes drilling safer and more efficient. Start by selecting the appropriate drill bit for the material you are working with; a masonry bit is ideal for concrete walls, while wood or metal bits work well on other surfaces. Ensure your drill is in good condition and properly charged if it’s cordless. Mark the drilling points with a pencil or a marker to help guide your placement and maintain accuracy.
Before beginning, wear safety glasses to protect your eyes from debris. Stabilize your body to prevent accidental slips while drilling. Use both hands to control the drill firmly, ensuring that your grip is consistent. If you’re drilling multiple holes, take breaks to avoid overheating the drill bit, which can cause it to wear out prematurely. Remaining aware of your surroundings will also decrease the risk of accidents.
Securing the Organizer to the Wall
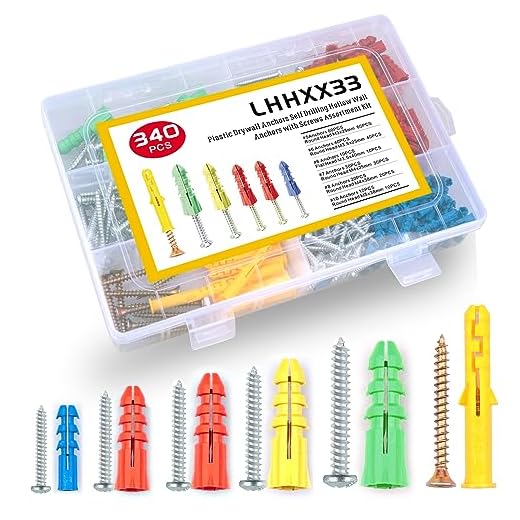
After drilling the necessary holes, it is important to secure the organizer properly to ensure that it can hold the intended weight and endure everyday use. Start by inserting wall anchors where you have drilled the holes, especially if you are mounting on drywall. These anchors provide extra support, preventing the screws from pulling out over time. Use screws that are suitable for the weight of your organizer and your items. Tighten the screws until they are snug, but be cautious not to over-tighten, as this can damage the wall or the organizer itself.
Once the organizer is firmly attached, it’s wise to double-check stability by gently pulling or pushing against it. This helps confirm that it is secured properly. If there is any movement, assess the installation and make adjustments as necessary. Depending on the design of the organizer, it may benefit from additional brackets or supports to enhance its stability. Taking the time to ensure everything is secure will result in a more functional and reliable product for your space.
Ensuring Stability and Durability
When securing a wall-mounted organizer, it is crucial to choose the right fasteners based on wall material. Using anchors for drywall or appropriate screws for wooden studs ensures strong adherence. The weight capacity of the organizer plays a significant role in determining the type of hardware needed. Follow manufacturer guidelines regarding maximum load limits to avoid any strain that could lead to failures.
Regular maintenance can contribute significantly to the longevity of your organizer. Inspect the mounted unit periodically, checking for signs of loosening or wear. Tightening screws and replacing any damaged components ensures that the organizer remains stable over time. Additionally, distribute weight evenly across the shelves to prevent tipping or bending, maintaining both functionality and aesthetic appeal.
Organizing Your Items Effectively
Arranging items in a wall-mounted organizer can greatly enhance functionality and accessibility. Begin by categorizing your items based on their purpose and frequency of use. Frequently accessed items should be placed at eye level for ease of reach, while lesser-used items can be stored higher up or in less visible areas. This not only declutters your space but also makes finding essential items much quicker.
Utilizing bins, baskets, or labeled containers helps maintain order within the organizer. Clear labels can provide visual cues for where specific items belong, fostering good organization habits. Additionally, consider grouping similar items together to streamline your workflow. This approach not only maximizes the use of your wall-mounted organizer but also creates a visually appealing arrangement.
Strategies for Optimal Use of Space
Maximizing space efficiency in a wall-mounted organizer requires thoughtful planning. Start by categorizing items based on usage frequency. Frequently used items should be placed at eye level or easily within reach. This arrangement not only streamlines access but also promotes an organized appearance, reducing clutter and enhancing functionality. Additionally, consider the size and shape of the items you store. Uniformity can save space, so opt for containers or bins that fit neatly within the organizer’s dimensions.
Incorporating vertical space is essential for effective organization. Utilize shelves and hooks that extend upward, ensuring that the upper portions of your wall organizer are not left unused. Employ clear or labeled storage options to maintain visibility and streamline retrieval. By strategically layering or stacking items where appropriate, you can create a coherent flow within the organizer. This approach not only addresses current needs but also allows for adaptability as your collection of items may grow over time.
FAQS
What tools do I need to install a wall-mounted organizer?
To install a wall-mounted organizer, you typically need a drill, drill bits, a level, a measuring tape, screws, and wall anchors. Depending on the type of organizer, additional tools such as a screwdriver or stud finder may also be helpful.
How can I find the right height to install my wall-mounted organizer?
The ideal height for installing a wall-mounted organizer depends on your personal preference and the items you plan to store. A good rule of thumb is to install it at a height that allows easy access, typically between 4 to 6 feet from the ground.
What should I do if I hit a stud while drilling?
If you hit a stud while drilling, you can choose to secure the organizer directly to the stud for better stability. However, if the position is not suitable, you can use wall anchors to install it in a different location.
How can I ensure my wall-mounted organizer is secure?
To ensure your wall-mounted organizer is secure, use the appropriate type and number of screws and wall anchors based on the weight and size of the organizer. Additionally, make sure to double-check that it is level before tightening the screws fully.
What are the best ways to organize items on a wall-mounted organizer?
To organize items effectively on a wall-mounted organizer, group similar items together, use labels for easy identification, and utilize containers or bins to prevent clutter. Consider the frequency of use to place frequently accessed items at eye level.
Related Links
What are the Benefits of Using Wall-Mounted Organizers in Fitness Spaces
How to Choose the Right Wall-Mounted Organizers for Your Home Gym
Roundup of Top 5 Wall-Mounted Organizers for Maximizing Space
Review of the Best Wall-Mounted Organizers for Home Gyms
10 Creative Wall-Mounted Organizer Ideas for Fitness Gear
The Evolution of Wall-Mounted Organizers in Home Fitness